Introduction
This guide shows how to setup and use Head office other costs.
The Head Office Other Costs tool allows you to add head office costs to outlets where you have not received an invoice eg Management Fee, Depreciation etc
Assumptions
You are using the finance module
Where to find this
To set up Head Office Other Costs, go to Head Office > Outlets > Set Up
To assign Head Office Other Costs, go to Head Office > Finance > Client A/C
Step-by-Step guide
Setting Up Other Head Office Costs
- Click Outlets > Setup > Manage Other Cost Names
- The next screen will present you with a list of Other Cost names that have already been set up in the system and will detail if they are a credit or a debit
- Click an the add button to add an additional Other Cost
- Enter the name and specify if it is a credit or debit
- The finance code fields can be populated if you wish to export the data out of IndiCater in a format suitable for importing into your accounting package
- Specify is the cost is applicable to 20% VAT
- Once complete, click Add Other Cost Name
- You can archive an existing Other Cost but clicking on it and ticking the archive box

Allocating Head Office Other Costs
- Click on Finance > Client A/C > Head Office Other Costs
- The system will always default to the current week and you will see any transactions you have already entered in that week
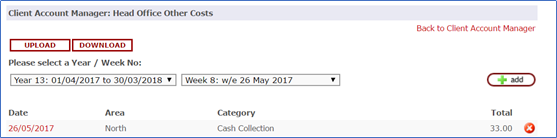
- From this screen you will have the option to either manually add individual transactions or use a template
- To manually add costs, click on the ADD button
- Choose the Area, category and Outlets you wish to assign the Other cost to
- Click Continue
- If you have selected All Outlets, you will now be able to to enter a figure to assign to all outlets (add the figure and click Allocate), or you can assign different figures to different outlets
- Then click Add Other Costs
- If you have selected one outlet only, you will be able to add a recurring cost
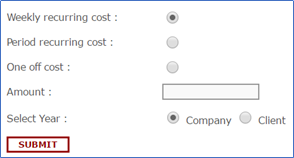
- You have the option to enter a weekly or period recurring costs and to select whether it should recur for the period of your company year or for the client's year
- Alternatively you can select to add a One Off Cost
- Click Submit
Using the template
- Click Download to download the template
Click Continue.
Step 2.3 Allocate Other Costs to Outlets in the area you have chosen,
A. If the cost is uniform across all the selected outlets use the field marked A in the illustration.
B. Where costs are different use the field next to each outlet to set the amounts for each outlet.
Click add other costs
Step 3.4 Adding cost from Template
3.4.1 Download the template.

Enter the amounts for the Other Costs
Note: Only edit the Amount filed on the template.
3.4.2 Click Upload the dialogue below will open.
A date selection to select the date of the other cost entry and you can then specify whether the cost is a Weekly recurring cost, Period recurring cost or a One off costs
Weekly recurring costs will be entered on each financial week in the system until the end of your financial year. Period recurring costs will be entered in the last week of each period until the end of the financial year. One off costs will be entered in the current week that you are uploading the other cost to.
Click on the submit button, browse to your template file stored on your local machine and submit. Once uploaded you will be redirected back to the information screen and your entry will be visible on each of the periods you have selected to upload to
Once Other costs have been allocated to an Outlet, they can be viewed in the Outlet (providing the user has the correct permissions) by clicking on the Finance - Other Costs - Assigned by Head Office sub module.
Once Other costs have been allocated to an Outlet, they are also visible as separate lines on the trading report and added to the total value of overheads for the outlet
Related Guides