Configuring the Budget versus Actual report for an outlet
version 09062016
The BVA report is configured for each outlet enabling you to select the specific income categories and purchasing categories required to generate cost of sales and GP information at outlet level.
By entering your budgets into IndiCater you can view these cost of sales lines against your budgeted figures to view the variance. You can also see the percentage relationship between lines.
This report is accessible at outlet level only (due to the bespoke nature of its set up) and requires configuration.
This report is a client option and can be turned on for the company as a whole and not for individual outlets.
Configuring the report
To configure the report for an outlet, you will need the Head Office – Outlet - Set Up permission.
- To configure this report first go to Head Office > Outlets > Set Up.
- Then go to ‘Edit Outlet’ and select the outlet that you wish to configure this report for.
- Click on BVA in red at the top of the page

- This will bring up 4 main headings:
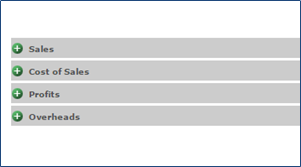
Each of these can be configured to show the specific data that you require. You can expand all options by clicking the Expand All option on the right of the page. You will then also see a Collapse All option.
Sales
Using the example that you wish to separate food and beverage sales and purchases to provide a separate GP figure for each, you can configure sales in the following way:
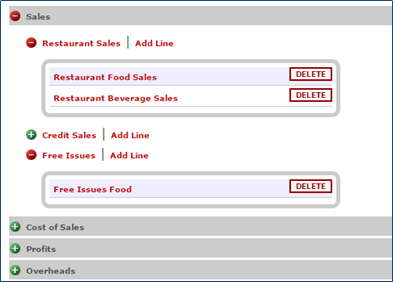
- Press the green plus sign to open up the Sales section.
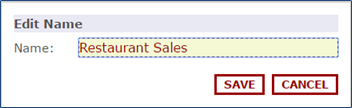
- The lines are automatically names Cash Sales, Credit Sales and Internal Sales. These can be renamed by clicking on the name.
- To configure the data to be picked up within Cash Sales, click on Add Line. You will first need to give the line a name, eg Food sales and then you can tick the income categories you want included in that line. Once ticked, that income category cannot be re-used in that income type. If you have the sale category available in both cash sales and credit sales for example, you will be able to select it once in each income type.
- Click on green cross to see all lines set up within each income type.
- If your outlet does not use one or any of these i.e. credit sales then you don’t need to configure those lines.
- Continue this until you have configured all of your income lines as you require, clicking on the headings if you wish to edit or using the ‘delete’ option if you wish to remove a line.
- All lines will automatically show as a percentage of the total sales figure in the percentage column on the BVA report.
Cost of Sales
- The cost of sales lines are automatically names Food, Sundry and Cleaning and Disposables. These can be renamed by clicking on them if required.
- To configure a line in Food, click on Add Line. You will see the box is spit into 3 areas: Categories, Other Cost Categories and Link Sales Lines.
- Your purchasing categories are listed under Categories. As in sales, once a purchasing category has been ticked it will not be available to select again.
- Other Cost Categories lets you select Head Office Other Costs which you may wish to include, for example you may wish to include Uniforms as a Head Office Other Cost within your Sundries cost of sales.
- Link Sales Line will show you the sales lines you have created above. This will link the costs of sales line to that sales line in the percentage column in the report. For example, if you tag your Food cost of sales lines to your Restaurant Sales line, you will see the Food cost of sales as a percentage of the Restaurant Sales in the BVA report.
- In the example below the first Cost of Sales line has been renamed F&B Cost of Sales, and two separate lines have been created, one to show all purchasing (and stock transfers and consumption) allocated to the food category and the other to all items allocated to the beverage purchasing category:
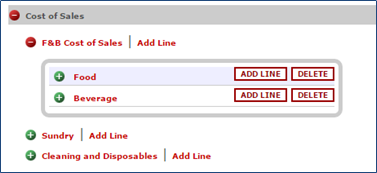
- Once configured, you have the option to add sub lines to your cost of sales lines. For example, you may wish to add a sub line to Food for Staff Meals and tag it as 8% of your Restaurants Sales. To do this you would click on Add Line next to Food, tick your selected sales line and save. This creates the line which you will then have the option to enter a percentage figure in.

Gross Profit
- You have the option to set the Profit lines that you wish to see on your report. This is not essential as the report will calculate a GP.
- If configuring a gross profit line, you can select the Sales lines and the Cost of Sales lines that you wish to include in the GP calculation. NB – as with the Sales and Cost of Sales, you can’t use the same tick options twice.
Overheads
- Within Overheads you can add Labour and Other Costs. These overheads costs will appear on the report below the GP line.
- Labour can be tagged to include any Labour purchases (providing a Labour purchasing category is in use such as ‘Agency Labour’). It is also possible to tag Head Office Other Costs that you wish to include in your labour costs.
- Actual Labour Cost cannot be configured but will pull through if you are using the Actual Labour Cost tool in Head Office Finance.
- Other Costs can be named and added by ticking from a list of your existing Head Office Other Costs.
- Once the set up is complete you can add your budget using the Budgeting section in the outlet Company page.
- Please note that once you have added a budget to a line on the BVA you will be unable to amend that line in the set up.
- This report can be run for a week, a calendar month or a reporting period. The report is run from within the outlet, Company, Reports, New Reports.
- Once run this report can be exported in to a selection of formats (i.e. Excel, Pdf, Word) by selecting the icon on the tool bar at the top of the report.
- If using the Client Invoicing module, you have the option to include the BVA as part of the Client Invoice.